Crochet Hook Necklace

Where do you usually crochet? I am usually crocheting while sitting on my living room sofa and more than often I lose my hook during the process.ย 
With this necklace, your crochet hook will always have a place to rest when you get a crochet break.

I’ll show you 2 modifications in the video, one for the popular ergonomic hook and the other for the metal crochet hooks.

I have another modification for my Addi crochet hook that you will find written here, since I don’t find them very commonly used, and I didn’t want to have a long video tutorial.

Pattern Abbreviation:ย 
CH: Chain
SC: Single Crochet
SC-blo: Single crochet into the back loop only
SC x 2: Single crochet into each of the next 2 stitches
2 SC: 2 single crochet stitches into the same stitch (increase)
Sl St: Slip stitch

Modified Crochet Necklace Pattern:
Rd 1: CH 2, SC x 3 into the second chain from hook. (3)
Rd 2 : 2SC-blo x 3ย  (6)
Rd 3 – Rd 8: SC-blo x 6 (6)
Rd 9: SC, 2SC, SC x 2, 2SC, SC (8)
Rd 10 – Rd 17: SC-blo x 8 (8)
At the end of Rd 17, sl st to join.

Crochet a chain to the length you like your necklace to be then slip stitch to the 5th stitch from where you began your chain on the holder body.

Let me know how you find this pattern and if you find it useful ๐Ÿ™‚

A Textured Spiral Square

I always like to try new twists to regular stitches or patterns. As I was thinking of a new Father’s Day gift, I wanted to design a sign with a twist. I had a couple of options on my mind, but I decided to go with a plain simple design and work with this textured spiral square as the building block.ย 
It is an easy pattern once you get the hang of it.

You can play with colors by making the square part in one color and changing it for the spiral part.ย 
I worked my DAD sign with a 4 mm hook to get a tight square. However, if you will be using this square to make a blanket, I highly recommend using a 5.5 mm hook.ย 

If you want to know more about how to increase the flat circle diameter before turning it to a square, this tutorial explains it.

You can also find this tutorial explaining how to join squares together helpful.ย 

And finally, for the DAD sign, I used 3 colors: black, grey and red.
All squares are made with worsted yarn (4) and a 4 mm hook.ย 
I skipped the black edging in the graph as I did not have enough black yarn. I also decided to make the black squares plain (I did not do the half double crochets on the spirals) for the same reason.
That affected the size of the final squares due to the lack of tension added by HDC stitches.
But overall, I am happy with the final project and my husband liked it as well (Yes, he saw it when I was finishing it.. An early Father’s Day gift ๐Ÿ™‚ )

You will need to crochet the following number of squares:
Black: 76
Red: 12
Grey: 24

Each square is about 2.75″
Width: 44″ = 111.7 cm
Length: 19.25″ = 48.9 cm

That’s all for today. I hope you enjoy the tutorial and pattern.ย 
Till next time, stay safe and keep crocheting ๐Ÿ™‚

Let’s Mingle CAL

posted in: Uncategorized | 0

I am so excited to finally be able to announce what I have been working on for a while.
I had the idea of creating a CAL to get us busy during lock down, quarantine and social distancing. And, oh my God, preparing for it is a LOT of work.
Since itโ€™s my first CAL project to design, I wanted it to be as perfect as it can be.
And since many are picking the hook for the first time or reconnecting with a long-forgotten hobby, I wanted to have a variation in my CAL to accommodate all levels of crochet expertise. So I hope you enjoy your time crocheting along with me.

What is a CAL?
Crochet along (or CAL) is an online event where a group of crochet lovers work the same pattern at the same time. The pattern is released in parts and has a starting and ending date.

Letโ€™s Mingle CAL
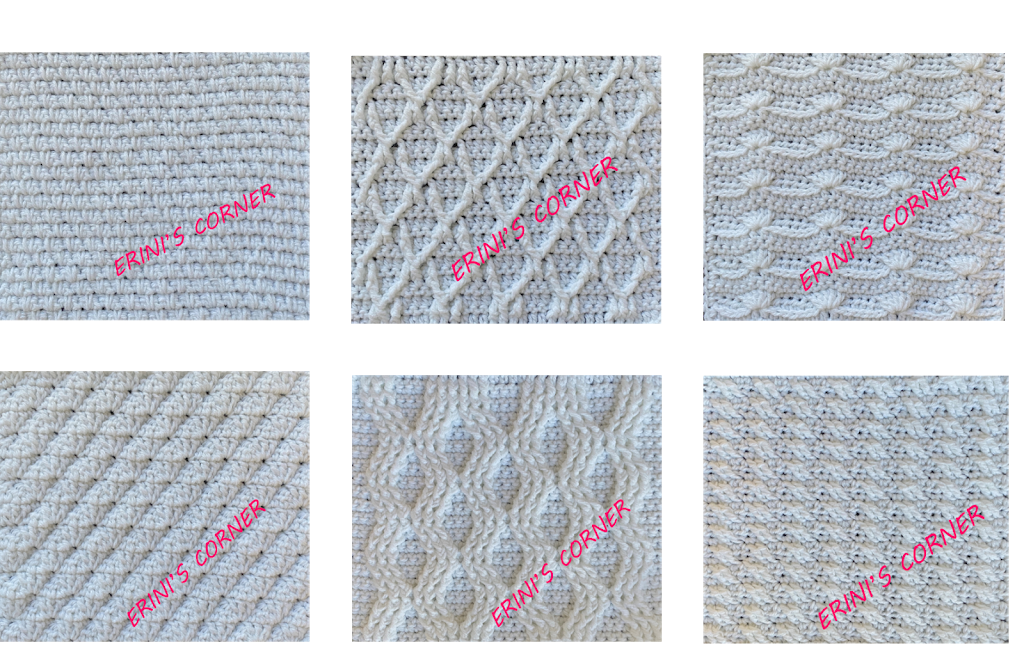
This CAL is a blanket of 6 squares. Video release dates will be announced shortly, so keep an eye on my blog. If you would like to get notified when each part is released, please hit the subscribe button on the top right side of the blog and enter your email address. Once you verify your email, you will be added to the email list.

Each pattern (block) can be made into a blanket on its own, as the patterns are not built on each other. Or you can repeat the squares as many times to have a unique blanket design. The final layout of the pattern is left for you to add your taste.

Social Media:

The written pattern of each block (and how to adjust the starting chain for a bigger version of each pattern) will be available in a bundle of all 6 patterns on my Ravelry store.  

On my YouTube channel, I will be showing steps of crocheting the small blocks to make the sample blanket.

In our Facebook group, we can share our progress photos and questions.

On Instagram, the CAL details will be released on @eriniscorner. You can always share your work using #eriniscornercal and #letsminglecal

Material:
Yarn: Light (3) โ€“ or a yarn of your choice with the matching hook size
Hook: 4 mm
Tapestry needle.
Stitch markers

You can purchase the yarn I used from this link: Bernat Baby Sport
I used Addi crochet hook which you can purchase here: Addi Crochet Hook

This pattern is also a good stash buster. Just make sure that you use yarn of the same fiber; acrylic, cotton or cotton blend or any other type. That will help with washing and taking care of the final project.

Letโ€™s Mingle CAL square final size:

You will notice that I am not specifying any gauges for this project. The gauge will depend on your tension and the size of you starting chain. If you are following my video tutorial, once your block length (height) equals the length of your starting chain (width), start working on your edge. This will also help if you decide to go with a different yarn weight and hook size.

Disclaimer:
This CAL project is NOT by any means sponsored by any social media platform or yarn company. All patterns are my own design and copyright to Eriniโ€™s Corner.

You can sell finished items made of these patterns. Please give credit to Eriniโ€™s Corner with the original design.
Any reproduction of the written patterns, video tutorials and photos either mechanically, electronically or through photocopying is NOT permitted.

Posts may contain affiliated link. I get a small commission, at no extra cost for you, on your purchases.

How to crochet a flat circle?

posted in: Uncategorized | 0
Happy Saturday …
During my crochet learning journey, I have met some challenges. One of which was how to crochet a flat circle. The struggle was real and I knew there should be an easy equation to get you to do a flat circle but with so many searches I couldn’t find it. Until it hit me one day. It was right there in front of me but it was not stated clearly.
So to save you the time and to get you at a right start from the beginning, I have created this video with a detailed explanation of how to crochet your own pattern of round FLAT circle with whatever stitch you choose.
Enjoy!

In The Dawn

posted in: Uncategorized | 1

Hello everyone,

Are you getting ready for the long weekend?
If you are like me, with no plans of camping this weekend, I have a new motif pattern to keep you busy. I have been working and frogging this motif all the past week to an extent that I woke up one day and I was counting the stitches in my dreams ๐Ÿ˜‚๐Ÿ˜‚.

So the story behind the name is nothing special other than the fact that I finally managed to put the pattern into writing at 5.30 am ๐Ÿ˜†. I always have difficulty in coming up with names for my patterns but this one was a piece of cake.. Yay, one thing off my list ๐Ÿ˜„.

So for this pattern, I used Caron Simply Soft yarn and a 5.5 mm hook. The final motif is around 6″ diagonally.

In the video, I used 2 different shades of green so you can easily see where the corners are joined on camera but in my humble opinion I like the one color sample more (however, I’ll be excited to see the color combination you’ll be using to crochet yours)

I will leave you here with the written, have a lovely weekend!
Pattern Key: (US terms)

Ch: chain
Beg: beginning
MR: magic ring
Mod sc: modified single crochet (check the notes below)
Pr: previous
Puff: puff stitch
Rd: round
Sc: single crochet
Sl st: slip stitch
St(s): stitch(es)
Sk: skip
Sp: space
Notes:
Modified single crochet stitch: Insert the hook into the stitch, yarn over and pull a loop, 2 loops on the hook, yarn over, pull through one loop only, 2 loops on the hook, insert the hook into the same stitch again, yarn over and pull a loop, 3 loops on the hook, yarn over and pull through the 3 loops.

At the end of each round, the total number of stitches will be mentioned between brackets

Stitch name x (No) โ€“ e.g. dc x 3: Means one double crochet stitch in the next 3 stitches
Pattern: 
Start with a MR, ch 1

Round 1:         sc x12 into MR, sl st to join     (12)

Round 2:         Ch 2, (puff, ch 1) x11, puff, sl st into ch2 sp   at the beg of the rd     (12 sp, 12 puffs)

Round 3:         Ch 3, sk the first puff of pr rd and into the next ch 1 sp (mod sc, ch 2) x 11, mod sc, sl st into the ch 3 sp at the beg of the rd                        (12 sp, 12 mod sc)
First Corner (A):

Round 1 A:      Ch 3, turn, sl st into the next ch 2 sp, turn, ch 1

Round 2 A:        sc x7 into the ch 3 sp of pr rd, sl st into the next mod sc of rd 3       (7 sc)

Round 3 A:      Ch 2, turn, (puff, ch 1) x 6, puff, sl st into the next ch 2 sp of rd 3     (7 puffs, 7 sp)

Round 4 A:      Ch 3, turn, sk the first puff, (mod sc into the next sp, ch 2) x6, mod sc into the last sp, sl st into the next ch 2 sp of rd 3
Before starting any of the 3 other corners:
Sl st into the same ch 2 sp you ended corner A at one more time, (sl st into the next mod sc, sl
st twice into the next ch 2 sp, sl st into the mod sc) x 2, then repeat the steps of the first corner

Terms:
If you intend to sell projects made from my free patterns you find on my YouTube Channel (Erini’s Crochet Corner), Instagram account or blog, I would appreciate it if you link it back to any of my accounts on social media. Thank you and happy crocheting ๐Ÿ™‚

Turning “Around the Rosie” into a square

posted in: Uncategorized | 0

Happy Sunday!

I’m over the moon with the feedback I’m getting on “Around the Rosie” pattern. To all who wrote me  comments, saved and put the pattern into their queues, a big thank you ๐Ÿ’“๐Ÿ’“.

Some have shown interest into making a blanket with the pattern and requested the steps on how to turn it into a square.

I have a video demonstrating the steps right here for you.

If you are interested into the written pattern, here are the steps:
Pattern Key: (US Terms)
Ch Chain
Dc Double Crochet
Hdc half double crochet
SC Single Crochet
Sl St Slip Stitch
sc-blo single crochet in the back loop only
St(s) Stitch(es)
Sk Skip
SP Space
Tr-blo Treble in the back loop only

Notes: 
Each round ends with a slip stitch to join
Chain (X), where (x) is the number of stitches, at the beginning of each round is NOT considered a stitch
At the end of each round, the total number of stitches will be mentioned between brackets
(No) Stitch name (e.g. 2 dc): Means 2 double crochet stitches in the same stitch
Stitch name x (No) โ€“ e.g. dc x 3: Means one double crochet stitch in the next 3 stitches
Before beginning round 8, cut off the yarn. Round 8 is worked on top of round 6.


Pattern:
Having the right side of the pattern facing you, attach your yarn to the first dc after a fpdc of round 6 from the wrong side (working behind the shells of round 7). Please refer to the video for illustration.
Round 8: Ch 3, *tr-blo into the same st of joining, tr-blo into the next 2 sts, ch 2, sk 1 st, tr-blo x 4*. Repeat *_* 7 more times, sl st to join.
Round 9: Ch 1, sc x3, 3sc into the sp, *hdc x3, 5dc, hdc x3, 3 sc into the sp, sc x7, 3 sc into the sp*. Repeat *__* 2 more times, hdc x3, 5dc, hdc x3, 3 sc into the sp, sc x4, sl st to join.
Round 10: Ch 1, sc-blo x 11, 3 sc,  *sc-blo x23, 3 sc*. Repeat *__* 2 more times. sc-blo x12, sl st to join, then cut off the yarn.
I will be thrilled to see your work. Please feel free to tag and follow me on Instagram and join my Facebook group.
Until next time, stay safe and happy crocheting! ๐Ÿงถ
Terms:
If you intend to sell projects made from my free patterns you find on my YouTube Channel (Erini’s Crochet Corner), Instagram account or blog, I would appreciate it if you link it back to any of my accounts on social media. Thank you and happy crocheting ๐Ÿ™‚

Around The Rosie

posted in: Uncategorized | 0

AROUND THE ROSIE

Material: DK, light yarn – 2.5 mm or the hook size to match the yarn used

Pattern Key: (US terms) 
Ch Chain
Dc Double Crochet
Fpdc Front post double crochet
MC Magic Circle
Pr Previous Round
SC Single Crochet
Sl St Slip Stitch
Shell 9 trebles in the same stitch
St(s) Stitch(es)
Sk skip
SP Space
Tr Treble crochet

Notes: 
Each round ends with a slip stitch to join
Chain (X), where (x) is the number of stitches, at the beginning of each round is NOT considered a stitch
At the end of each round, the total number of stitches will be mentioned between brackets
(No) Stitch name (e.g. 2 dc): Means 2 double crochet stitches in the same stitch
Stitch name x (No) โ€“ e.g. dc x 3: Means one double crochet stitch in the next 3 stitches

A video is available showing a step by step in the link: Around The Rosie

Pattern: 
Start with a MC
Round 1: Ch 1, 6 sc into the MC, sl st to join (6)
Round 2: Ch 1, 2sc into each st, sl st to join (12)
Round 3: Ch 2 (not considered a stitch), 2dc into each st, sl st to join (24)
Round 4: Ch 2, *2dc x 2, 1 fpdc *. Repeat *__* 7 more times (32 dc, 8 fpdc)
Round 5: Ch 2, *2dc, 1dc, 2 dc, 1 dc, 1 fpdc*. Repeat *__* 7 more times (48 dc, 8 fpdc) Round 6: Ch 2, *1 dc x 2, 2dc, 1 dc x 3, 1 fpdc*. Repeat * __* 7 more times (56 dc, 8 fpdc) Round 7: Ch 3, *sk 3 sts, shell of 9 tr into 4th st, sk 3 sts, 1 fpdc*. Repeat * __* 7 more times (72 tr, 8 fpdc)

Terms:
If you intend to sell projects made from my free patterns you find on my YouTube Channel (Erini’s Crochet Corner), Instagram account or blog, I would appreciate it if you link it back to any of my accounts on social media. Thank you and happy crocheting ๐Ÿ™‚